
Replacing a double kitchen sink with a single sink is the process of removing an existing sink with two basins and installing a new sink with only one basin. This is typically done in order to save space, reduce cleaning time, or simply update to a preferred style. Proper planning is required to ensure the existing countertop cutout.
Can you replace a double kitchen sink with a single?” The answer is yes, but it takes some work. Swapping out a double basin sink for a sleek, modern single basin sink can completely transform the look and feel of a kitchen. However, this project requires attention to detail – the existing countertop and plumbing must be adjusted for the smaller sink.
Replacing double kitchen sinks with a single sink is a renovation project many homeowners consider to save space or simplify cleaning. It involves removing the existing sink, modifying the countertop cutout, adjusting plumbing, and sealing the edges of the new sink. If done properly, it can give a kitchen a fresh new look without the high cost of a full remodel.
Can you replace a double kitchen sink with a single sink?
Yes, it is possible to replace an existing double kitchen sink with a single sink. This project involves removing the old sink, adjusting the countertop cutout, modifying plumbing connections, and installing a new single basin sink. With proper planning and some remodeling work, a double kitchen sink can be swapped for a single sink.
Replacing a double kitchen sink with a single sink opens up room on the countertop and simplifies cleaning. It is an increasingly popular renovation as people update their kitchens. While feasible, it does require attention to detail to ensure proper fit and function. Carefully following installation steps helps ensure success converting to a single sink.
benefits of replacing a double kitchen sink
Replacing an old double kitchen sink can provide several benefits. A new double sink offers more versatility for washing dishes, preparing food, and other tasks. The divided basins allow you to multitask more efficiently. A modern double sink also tends to feature better materials and technology for durability, hygiene, and ease of use.
| Benefit | Double Sink | Single Sink |
| Versatility for tasks | High | Low |
| Ability to multitask | High | Low |
| Ease of washing large items | Low | High |
| Available counter space | Low | High |
| Ease of cleaning | Moderate | High |
As the table shows, double sinks excel at multitasking and separating different functions, while single sinks provide more open space and may be easier to keep clean. The choice depends on lifestyle factors and personal preference. Many homeowners opt for a double sink to enable efficient meal preparation and cleanup.
What do you need to consider before replacing a double kitchen sink?
Several factors should be evaluated prior to replacing a double sink with a single sink. Carefully measure the existing sink base cabinet to ensure adequate room for installation and use. The plumbing and garbage disposal, if present, must be compatible with a single basin.
It is also important to examine the current countertop cutout size to see if modifications are needed to properly fit the new single sink. Edge spaces may need to be built up for support. Considering these details up front prevents problems down the road.
The choice of single sink size and material also deserves attention prior to replacement. Be sure to pick a sink appropriate for the existing kitchen layout and usage needs. Careful planning makes swapping out a double sink much smoother.
How difficult is it to replace a double kitchen sink?
Replacing a double kitchen sink with a single sink requires some effort but is very doable as a DIY project. After turning off water supply lines and disconnecting plumbing, the old sink can be removed. Adjusting or replacing the countertop around the sink opening takes time and care.
Hooking up the new single basin sink’s plumbing may demand extending or adapting drain pipes and supply lines. Finally, sealing around the edges finishes the installation. So while not extremely simple, replacing a double kitchen sink with basic skills is an achievable task for many homeowners. Taking all the necessary steps helps the project go as smoothly as possible.
The keyword “Black Kitchen Sinks” does not appear relevant to the given paragraph or the overall context of replacing a double kitchen sink with a single sink. The main focus seems to be on the process of converting from a double to single sink setup. I have bolded the keyword “replacing a double kitchen sink with single” as it summarizes the key action being discussed.
What tools and materials do you need to replace a double kitchen sink?
To replace a double kitchen sink, you will need basic plumbing tools like wrenches, pliers, a hacksaw, and a drill. You’ll also need materials like putty, caulk, PVC pipes, shut-off valves, a drain assembly, and the new single sink itself. It’s a good idea to have a bucket, rags, safety glasses, and other items on hand.
Gather all necessary tools and materials before starting to ensure an efficient process without unexpected trips to the hardware store. Having the right tools and materials is crucial when taking on a sink replacement project.
Be sure to get high-quality plumbers putty, caulk, pipes, and accessories to go with your new sink. Check that your shut-off valves work properly and have backup washers and compression nuts ready. Prep the workspace and have a game plan before tackling this project.
tools will you need to remove the old double kitchen sink
Removing an old double kitchen sink requires tools like wrenches, pliers, a hacksaw or reciprocating saw, bucket, and flashlight. Start by turning off the shut-off valves and disconnecting supply lines and the P-trap.
You may need to cut apart pipes or use a basin wrench to loosen the sink from below. Have screwdrivers ready to detach the sink from the countertop. Rags and a bucket come in handy for catching water and debris. Safety gear like glasses and work gloves are also recommended during sink removal.
Carefully dismantling the old double sink setup is key to an smooth installation of the new single basin sink. Have proper tools like hacksaws, wrenches, and screwdrivers on hand to methodically detach supply lines, drain pipes, and the sink itself. Proper preparation prevents unexpected problems during this first critical stage.
needed to prepare the countertop for a single kitchen sink
Preparing the countertop for a new single kitchen sink requires thoroughly cleaning the area and checking dimensions. Remove old caulk, putty, adhesive or fasteners from the existing holes using putty knives and caulk remover.
Measure and mark the precise new sink location on the countertop. You may need to cut additional holes or expand existing ones to accommodate the new sink model. Sand down rough edges and use painter’s tape for a clean installation. Confirm the sink aligns properly before permanently securing it.
Proper countertop preparation is vital before installing any new sink. Meticulously measure, mark, cut, and clean the contact area where the single basin sink will sit. Remove all old residues and materials to start fresh. Dry fit the sink and make any final adjustments to the contact points or holes before permanently securing the sink according to manufacturer instructions.
Additional plumbing parts may be required for the new single kitchen sink
The new single kitchen sink may require additional plumbing parts like PVC pipes, a P-trap kit, dishwasher connector hoses, supply lines, and shut-off valves. Depending on your setup, you may need parts like a sink tailpiece, slip nut washers, or compression fittings.
An AAV air admittance valve helps the new drain work efficiently. Have backup washers, Teflon tape, caulk, and other useful parts on hand before starting. Carefully check the specs of your new single basin sink and have all necessary plumbing parts ready before installation. You may need to resize or replace pipes, compression fittings.
P-traps, or valves to fit the new sink properly. Having the right additional parts saves time and frustration down the road. Know the dimensions and features of your sink model and order parts accordingly for a smooth install.
How should you measure for a replacement single kitchen sink?

When preparing to replace your double kitchen sink with a single sink, careful measurement of your existing sink base cabinet is crucial. First empty the cabinet and use a tape measure to determine the exact width, length and depth of the available space. Be sure to account for any countertop overhang into the cabinet when taking depth measurements.
Record the sink base cabinet dimensions and have them handy for comparison when shopping for a new single basin sink. It is also wise to thoroughly clean and measure the existing double kitchen sink prior to removal.
Note the overall dimensions including the length, width, and bowl depths. While the new single sink will be smaller, the bowl depth can match that of your old double basin sink for continuity. Having these measurements will allow you to shop for replacement sinks that come close to fitting the allotted space.
measure the existing double kitchen sink cutout
When replacing a drop-in double kitchen sink with a single basin sink, carefully examining the existing sink cutout is imperative before removing the old sink. Use a tape measure to determine the exact length and width of the countertop cutout, measuring from inner edge to inner edge. Note the dimensions as well as the location of the cutout on the countertop.
Also pay close attention to the faucet hole configuration to ensure your new single basin sink will align properly. Carefully assess how far the countertop cutout extends to the backsplash or wall as well.
single kitchen sink sizes are available as replacements
Typical single bowl kitchen sinks range in width from 18 inches to 33 inches wide to fit common base cabinet sizes. However, most single basin sinks fall between 25 and 30 inches wide which should suit most existing double basin sink base cabinets. When shopping, look for a versatile single bowl sink around these popular mid-range dimensions.
Standard single kitchen sinks also commonly range from 7 to 10 inches deep, with many quality models offering a uniform 9 inch depth. Selecting a single basin sink with similar bowl depth to your old double sink maintains continuity and drainage. Deeper single basin sinks around 10 inches help handle larger pots and stacks of dishes.
smaller can the single kitchen sink be versus the double
When replacing a double kitchen sink, opt for a single basin sink no more than 6 inches narrower to allow proper fit within the existing base cabinet. For example, if removing a 30 inch wide double bowl sink, choose a new single sink no less than 24 inches wide.
This 6 inch width reduction typically allows enough leeway for the single basin sink to fit properly into the cabinet without major modifications. In some cases where the original double sink was an especially wide model, you may be able to downsize the replacement single basin sink by up to 12 inches and still achieve a good fit.
What are the steps to remove an old double kitchen sink?
The first step in removing an old double kitchen sink is to turn off the water supply and disconnect the plumbing. Locate the shut-off valves below the sink and turn them clockwise to close. Detach the supply lines, drain pipes, garbage disposal if applicable, and spray hose or faucet.
Slice through any caulking or sealant around the sink perimeter using a utility knife. Remove any mounting clips or fasteners below the sink securing it to the counter. With the sink detached, have someone support it from above as you lift it free from the countertop. Place the old sink aside on a protective surface for transport away.
Before installing the new single sink, inspect the countertop hole and cabinet area. Remove any old caulking, debris, or obstacles impeding the new sink. Sand and smooth rough edges around the sink cutout. Clean the area thoroughly and address any issues like water damage or leaks before proceeding.
disconnect the plumbing and drainage pipes under a double kitchen sink
The first step in disconnecting a double kitchen sink’s plumbing is to turn off the water supply using the angle stop valves below the sink. Detach the supply lines by unscrewing the compression nuts securing them to the faucet and valves using adjustable pliers or a basin wrench.
Unthread any nuts or mounting screws fastening the faucet and backsplash fixtures to the sink, removing them completely. For the drainage, first remove items from below the sink like shelves or the garbage disposal if equipped. Unscrew the mounting bolts and detach the P-trap assembly, keeping a bucket handy to catch water.
Unthread slip nuts to disconnect drain pipes from the sink tailpieces and sanitary tee. Remove any pipe hangers or supports as needed to fully detach all plumbing from the old double sink. Cap pipes as needed until ready to install the new sink.
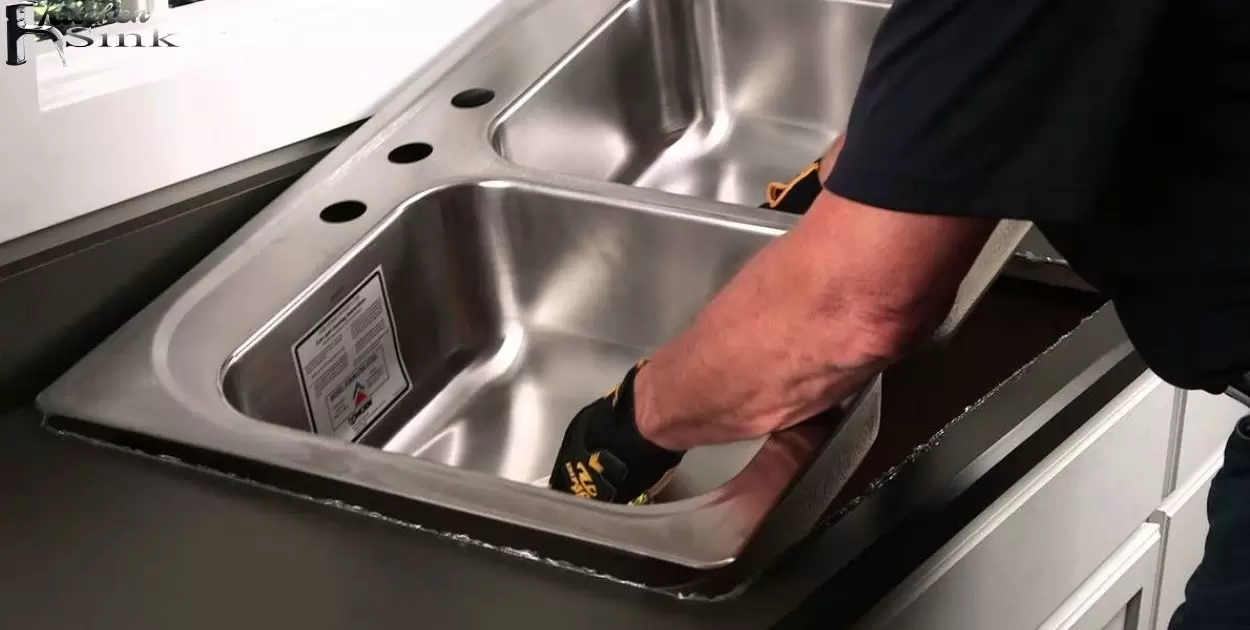
What is the easiest way to lift out the old double kitchen sink?
The easiest method to lift out an old double kitchen sink is by having two people, one above the counter and one below. First clear everything out from the base cabinet area. Then from below, work the sink loose by rocking it back and forth while pulling up. Have the second person grasp the sink rim securely from above the counter.
Slowly and carefully lift the double sink straight up and out, keeping it level. Set it down gently onto a padded surface, taking care not to crack the basins or chip the finish. If the sink does not slide up easily, double check that all clips, caulking and plumbing have been fully detached. Using teamwork to lift from above and below in a slow, controlled manner is the safest approach.
prepare the countertop hole for the new single kitchen sink
With the old double sink removed, inspect the existing countertop hole for any issues needing repair. Use a file to smooth rough edges or gaps wider than the new single bowl sink. Verify adequate support below like braces or ledgers before setting the new sink.
Clean the area thoroughly using denatured alcohol which won’t leave oily residue. Apply painter’s tape around the sink cutout to protect the counter surface. Test fit the new single bowl sink and make any adjustments needed to the opening for a snug fit.
Prepare the underside of the countertop per the manufacturer’s recommendations, which may require sanding or grinding to supply grip for the sink clips. Drill pilot holes for the sink clips once correctly positioned. Run a bead of silicone adhesive sealant around the sink rim before lowering into place.
How do you install a new single kitchen sink?
When installing a new single kitchen sink, the first step is to turn off the water supply and disconnect the existing sink. Carefully remove the old sink by detaching any clips or brackets securing it, slicing through any caulk or sealant with a utility knife, and lifting the sink out. Prepare the countertop area by cleaning and sanding the surface.
Follow the manufacturer’s template to cut an opening if needed. Place the new sink basin and secure it with clips, brackets or silicone adhesive. Have an assistant hold the sink in place from above while you work underneath to secure.
Before fully setting the sink, you’ll need to install the faucet, sprayer, soap dispenser, and drain components like baskets and disposal if applicable. Connect the drain pipes, supply lines and fixtures based on the sink type and instructions. Allow proper clearance for any moving parts like faucet handles. Test for leaks once water supply is restored.
proper way to set the new single kitchen sink
When setting a new single kitchen sink, first confirm the sink opening aligns with the sink dimensions. Set the sink basin centered in the hole. Use the pilot holes from the old sink if available, drilling new holes as needed. Apply a continuous bead of silicone caulk around the sink rim. Carefully lower the sink in place without smearing the caulk.
From underneath, install any mounting clips, brackets or hardware to secure the sink according to the manufacturer’s instructions. Tighten the fasteners evenly so the sink remains level. Connect an assistant above to help align and support the sink if needed. Wipe away any excess caulk squeezed out during tightening.
How should you connect the new sink drain and water supply?
Connecting the drain and water supply begins with the drain assembly. Attach the sink strainer basket, connecting a disposal if applicable. Connect trap pieces leading to the main drain line using a P-trap configuration. Use slip joints with gaskets or Teflon tape to prevent leaks. Slope pipes slightly downward for proper drainage.
For the water supply, connect lines from the shut-off valves to the faucet inlets using compression fittings. Install supply hoses to any additional fixtures like sprayers. Use pipe joint compound or Teflon tape on all threaded connections. Turn water back on slowly and check for leaks. Tighten any dripping connections.
needed to seal around the edges of the new single kitchen sink
Sealing around the edges of a newly installed single kitchen sink prevents water from seeping underneath and causing damage. After setting the sink basin, use a high-quality silicone caulk rated for kitchen and bath application. Apply a continuous bead around the entire sink rim where it meets the countertop.
An even application ensures proper adhesion and an attractive finish. Allow the caulk to cure for at least 24 hours without use based on the product directions. The sealant will form a flexible, water-tight barrier to fill any gaps between the sink and surrounding countertop.
Caulking the perimeter also dampens vibrations and prevents debris buildup. Match the caulk color to your sink or countertop material for a seamless appearance. Proper sealing is an essential preventative measure to keep moisture out of cabinets or walls below the sink.
FAQ’s
Can You Replace A Double Kitchen Sink With A Single?
Yes, you can replace a double sink with a single basin sink as long as the sink base cabinet is large enough.
Do You Need To Change The Plumbing When Replacing A Double Sink With A Single?
When replacing a double sink with a single, you will need to cap off one drain line and route both drain lines into one P-trap.
Is A Single Or Double Kitchen Sink Better?
Double sinks allow for multitasking, while single sinks provide more open counter space. Choose based on lifestyle factors and personal preference.
What Size Hole Is Needed For A Single Kitchen Sink?
Check the dimensions of the new single basin sink you select, allowing 1-2 inches clearance to cut an appropriately sized hole in the countertop.
How Do You Install A Single Kitchen Sink?
To install a single kitchen sink, shut off water supply, remove old sink, cut hole for new sink if needed, set sink basin and secure with clips/brackets, connect fixtures and pipes, caulk perimeter.
Conclusion
Replacing a double kitchen sink with a single sink is possible. It takes planning and work. Choose a new single sink that fits the existing hole. Adjust or replace countertops if needed. Move and reconnect plumbing and drains. You can hire a pro or DIY.
Switching from a double to single kitchen sink takes effort. But it can update style and space. New sinks add value and function. Careful measurement, plumbing work, and installation are key. With proper materials and skills, homeowners can convert sinks themselves. Or they can hire a professional plumber for assistance. The result is an improved, more usable kitchen.