
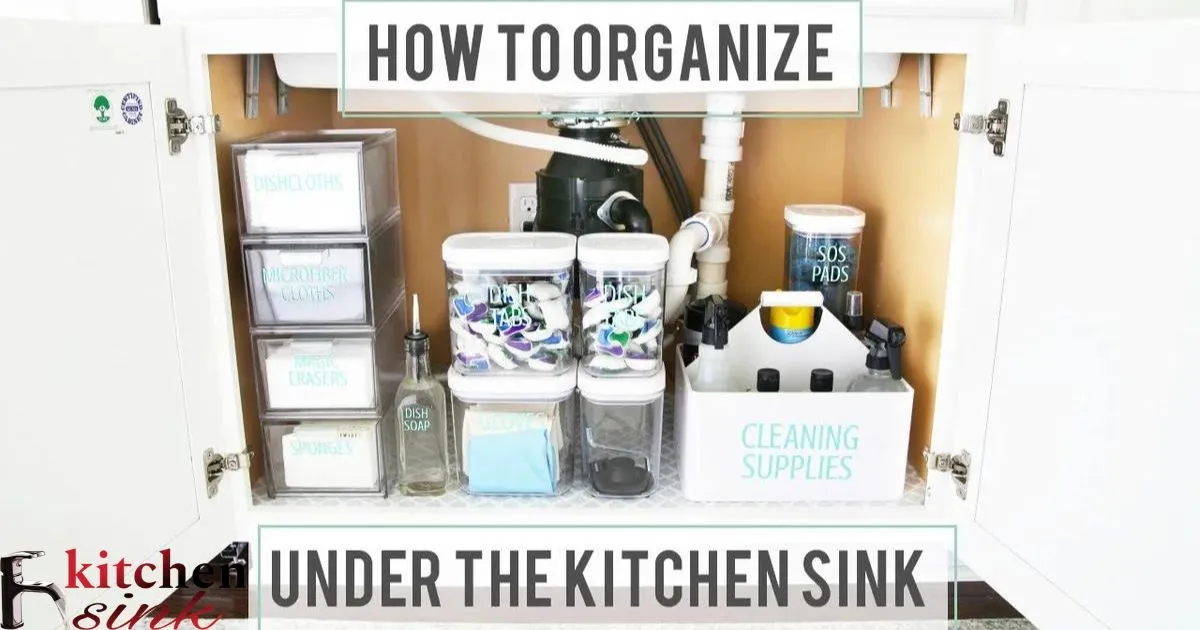
Organizing under the kitchen sink means properly sorting and storing all the cleaning supplies and tools that are typically kept in the cabinet below the sink. It involves grouping similar items together and placing them in designated areas or containers so everything has a place and is easy to find.
The space under the kitchen sink is usually cluttered with bottles, sprays, and other cleaning essentials all jumbled together in a disorganized mess. “How To Organize Under Kitchen Sink?” is a question many homeowners have, as this cabinet needs to efficiently hold all the necessary supplies while still being easy to navigate through.
Proper organization under the sink starts with going through all the items and discarding anything that is expired, torn, or no longer needed. Similar products like bleach, dish soap and glass cleaners should be grouped together in labeled containers or bins. Broom handles and mops can stand upright in the back corners.
Organizing The Kitchen Sink Cabinet
Plastic storage containers are a great way to organize items under the kitchen sink. Clear containers allow you to see what is inside so nothing gets forgotten or mixed together. Stackable containers make the most of vertical space. Labels help everything have a place so it is easy to find what you need.
A variety of sized containers lets you neatly store both large and small items without clutter. Large containers at the back hold big bottles while narrow spaces in front work well for individual cleaning products. With containers grouping like items, Measure For A Kitchen Sink cleaning the kitchen stays organized.
What Containers Are Best For Organizing Under The Kitchen Sink?
Durable plastic storage bins are ideal for holding cleaning supplies under the sink. They protect items from leaks and spills. Stackable bins with tight sealing lids prevent spills if the cabinet gets jostled. Bins in uniform sizes and with handles make everything easy to remove, view contents, and replace neatly in the cabinet.
Clear containers show contents without needing to open every bin. Grouping items like bleach, mildew remover and dish soap together in clear bins keeps hazardous materials safely separate from kitchen essentials like sponges and rags. Labels identify what goes where for simple clean-up.
Crates For Cleaning Supplies
Plastic storage crates designed for the pantry or garage work well under the kitchen sink to hold bulk cleaning supplies. Deep crates accommodate large jugs that won’t fit in shallower bins. Handles make heavy crates easy to pull out when needed.
Slotted crates provide excellent ventilation to prevent musty odors in supplies stored long-term like extra sponges or cleaning cloths. Open grating also allows a quick visual check of stock levels without removing the entire crate. Tall skinny crates fit awkward vertical spaces that boxes cannot occupy.
Bins For Chemicals
Stacked plastic bins keep dangerous chemicals separated and secure under the kitchen sink. Wide lipped bins prevent accidental spills if jostled in the confined space. Smaller bins allow organizing multiple chemicals neatly without overcrowding.
Individual bins for each type of chemical, such as one for bleach, another for drain cleaner, etc. ensures proper mixtures and usage. Secure stacking prevents the potential for toppled containers and spills in the case of an earthquake. Hazard labels applied to the outside help identify contents at a glance to prevent accidental mixing.
Drawers For Kid-Safe Storage
Pull out drawers under the sink provide excellent childproof organization for cleaners and chemicals. Finger pinching risks are eliminated versus open front cabinets. Soft close drawer slides prevent little hands from getting pinched.
Shallow lip on top drawers keeps upright bottles, powders and liquids in place if bumped from above. Dividers or stacked plastic trays organize items neatly into sections without risk of spill or mix ups that come from rummaging through an open box or bin. Easily removable trays make clean up quick.
Risers For Maximizing Space
Installing adjustable risers in the corners and along the back wall of the cabinet lifts stored items, creating extra usable space beneath. Risers neatly accommodate bulkier bottles along with open floor space below for boxes or bins.
Modular interlocking riser panels fit any configuration and raise contents by 3-6 inches. The added height prevents issues with bottles or containers getting buried behind or lost in shadowed corners. Risers make every inch count without clutter. Everything finds a home in view for easy access.
How Can I Utilize Vertical Space Under The Kitchen Sink?
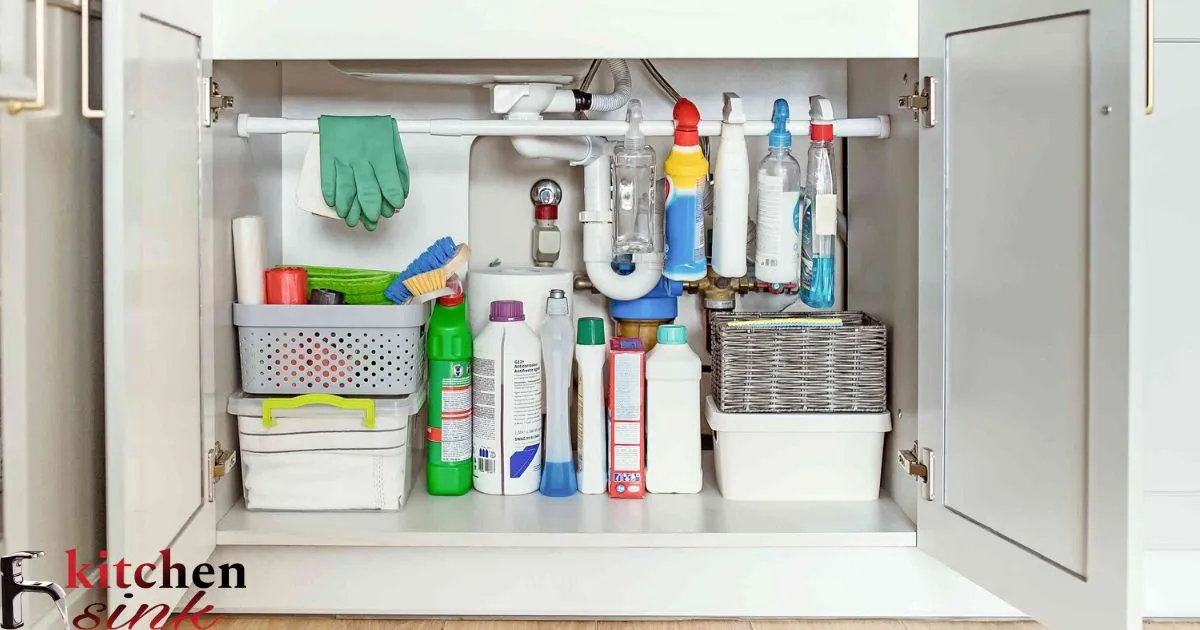
Attach a pole along the back wall to hang cleaning tools by their built-in holes or hooks. A tension rod along the sidewall provides additional hanging space for mops, dusters or extendable poles. Tools remain off the floor while still accessible.
Add pegboards to the cabinet doors for hanging brooms, brushes, and other tools. Inexpensive pegboard clings securely to cabinet surfaces and provides instant variable hanging storage without permanence. Positions holes exactly where needed.
Hanging Mops And Brooms
Mops and brooms clutter the floor of the cabinet when stored horizontally. Hanging them vertically from the pole along the back wall keeps floors clear and tools off the ground.
Strong dual prong hangers cradle broom and mop handles securely. Hook and loop tape straps hold mop heads upright and compact against their handles. Now the maximum number of cleaning tools stay organized and take up the least space in the cabinet.
Slot Baskets For Rolls
Wall mounted wire baskets are perfect for holding paper towels, aluminum foil and plastic wrap rolls. Slots allow tearing off squares or foil easily with one hand.
Baskets mounted high up maintain roll hygiene by keeping them off potentially wet cabinet floors. Contents remain clean, crisp and protected inside their plastic casings versus getting squished on floor storage. Strategic positioning makes each roll individually accessible.
Hooks For Accessories
Add a small pegboard shelf above the plumbing to utilize wasted vertical space. Hooks hold scouring pads, sponges and scrubbers up off the shelf.
Drain brushes, plungers and dusters find homes on hooks without taking floor space. Single hooks prevent dirty bristles from dragging and keep cleaning tools organized neatly within reach above the cabinet plumbing. Everything finds a place for efficient cleaning.
Shelves Above Plumbing
Install removable shelves above cabinet plumbing to take advantage of unusable dead space. Small parts like utility brushes, rubber gloves and cleaning solution bottles organize neatly.
Divided shelves, baskets or interlocking storage trays with lids corral little items and prevent shifting during cabinet opening/closing. Contents remain dust-free, visible and accessible in vertical space above pipework that would otherwise go to waste.
When Should Items Be Discarded From The Kitchen Sink Cabinet?
Clean out sink storage regularly to avoid keeping expired or unneeded products that just take up space. Check dates – any cleaning supplies beyond 2 years old should go. Older chemicals may not work effectively or could be unsafe if too concentrated from solvent loss over time.
Broken tools with missing parts only collect dust and get in the way. Look for hairline cracks on broom bristles that can dull with wear. Replace torn scrubbers or scrapers that no longer clean well. Out with the flawed fixtures to make room for functional helpers.
Outdated Cleaning Products
Check bottles for expired use-by dates just like food items. Harsh chemicals do degrade over time and may lose potency or potentially become more corrosive. Toxic fumes and chemical exposure risks aren’t worth the sink space. Avoid expired drain cleaners or multi-surface sprays.
Natural cleaners have shorter shelf lives too as essential oils separate. Cloudy scrubby looks or yeasty smells indicate formulas breaking down. Refreshing with new eco versions keeps your cleaning green and effective.
Broken Tools
Look tools over for breaks or defects that reduce usefulness like loose broom/mop head attachments or snapped dustpan walls. Cracked sponges can harbor bacteria posing hygiene risks, so replace as needed.
Damaged items may seem salvageable but usually aren’t worth the hassle. Keeping broken tools wastes cabinet space better used for working substitutes. Discard when performance declines below par to maintain a functional toolkit.
Empty Containers
Once bottles, cans and jars are emptied, resist hoarding hollowed husks that serve no purpose cluttering storage. Even if keepers, wipe recycled plastics clean for donating, not dusty dead space in sink cabinets.
Fully drained spray and pump bottles collapse easily for compact recycling or disposal. No sense preserving vacated vessels – get lids on and load the empties for trash or curbside pickup. Dejunking cleans house and head.
Best Way To Organize Cleaning Supplies Under The Kitchen Sink
5 tips for the best way to organize cleaning supplies under the kitchen sink
- Group by category. Separate supplies into cleaning agents, scrubbers, pantry items, and chemicals. Further divide categories into similar items like spray cleaners and dish soaps. This makes finding what you need easy.
- Add labels. Use labels or markers to clearly identify each storage container and area. Label bins, shelves, and drawers so contents are clear at a glance. This prevents mixing items.
- Keep frequently used items in front. Position most-grabbed supplies like sponges and all-purpose cleaners toward the front for fast access. Rearrange occasionally used items toward the back or higher shelves.
- consider organizers. Slide-out trays, pull-out shelves, and over-the-door hangers maximize space. They create more visible and accessible storage without clutter.
- Rotate stock. As front supplies are used, move replacements forward from the rear. This prevents infrequently used items from expiring unseen in dark back areas of the cabinet. Proper rotation keeps your cleaning tools fresh and organized.
Group By Category
Categorize supplies into cleaning agents, scrubbers, pantry items and chemicals then further subdivide. Sponges and cloths nest in one bin lined shelves while bleach alternate bins with dish soap for easy pickup.
Orderly assortment streamlines tasks. Similar solutions sit alongside each other rather than dispersed throughout the whole cabinet. Styles stay align making maintenance a smooth operation. Everything finds its logical neighborhood.
Add Labels For Identification
Labels make organization click! Write directly on bins with paint pen or stick premade labels for easy updates. Mark bins clearly like “Dish Soap” or “Sponges”.
Professional label makers quickly whip up durable tags listing contents for each shelf or drawer. Never wonder what that unmarked plastic tub holds again. Proper identification lays out where stuff lives neatly.
Keep Frequently Used Items In Front
Position most grabbed product like sponges and all purpose cleaners within easy reach toward the cabinet entrance. Interior shelves shadowed depths work better for seldom touched stockpile preventing infrequent uses getting lost or forgotten at the back.
Arrange go-to supplies up front for convenience. You’ll naturally tidy up access points for grab-and-go on busy days. Everything gets noticed and maintained its place.
Store Infrequently Used In The Back
Dedicate rear cabinet real estate and highest shelves for reserve stashes that gather dust while store bought varieties get primary placement up front. Maintain backup spares where out of sight unless needed.
Rotate stock from rear reserves forward as front liners deplete to prevent supplies from expiring unseen in darkness. Unused extenders stay accessible yet organized out of daily sightlines.
Can Kitchen Sink Organizers Make Fitting Everything Easier?
Kitchen sink organizers are designed to help you fit more cleaning supplies under the sink in an easy to access way. Different types of organizers provide extra storage in various formats. Using organizers can help you utilize every inch of space.
| Organizer | Benefit |
| Slide-out trays | Trays on smooth runners glide out items for viewing without disturbing stacked storage. |
| Spinning turntables | A tidy circle of storage tubs rotates for one-handed selection. Less bending and searching. |
| Pull-out shelves | Expand the cabinet workspace by pulling shelves completely out. |
| Over-the-door hangers | Hanging brooms and mops maximizes vertical space without taking floor area. |
| Baskets and bins | Stackable containers nest neatly and see contents without removing other bins. |
Organizers create order and accessibility so each cleaning tool has a logical well-designed home in the limited space under the sink. Various styles suit any cabinet setup and help everything fit with ease.
Over-The-Door Hangers
Shoe organizers hung on cabinet fronts corral wide brooms and extendable poles upright without floor footprint. Gripper rods keep bristles off cabinet surfaces like wood or tile to maintain cleanliness.
Multi-hook hangers arrange tools above eye level yet reachable. Extra hanging keeps workspaces beneath open and uncluttered by floating mops up high. Innovative door space helps everything find a handy place.
Frequently Asked Question
Store Cleaning Supplies Together In Clear Plastic Bins Or Containers
Keeps similar items grouped and visible. Label bins for easy identification.
Hang Brooms, Mops And Other Long Handled Tools Inside Cabinet
Get them up and out of the way using over-the-door brackets or wall mounts.
Use Pull Out Shelves Or Drawer Organizers For Small Items
Easily access things like sponges, gloves and scrubbers without rummaging.
Designate Different Shelves Or Areas For Chemicals And Supplies
Separate cleaning products, reusable food storage bags and other items.
Take Inventory Of What’s Underneath Regularly
Remove expired or unused things during regular purges to reduce clutter.
Conclusion
Organizing the space under the kitchen sink takes some planning but pays off in finding what you need quickly and easily. By grouping like items, using pull-out shelves or drawers, and hanging long-handled tools, everything has its place. Chemicals and reusable items each have their designated area so they don’t get mixed together.
With some adjustments to how you utilize the space and containerize your supplies, the under-sink area can become much more functional. Taking a bold inventory regularly ensures only what gets used regularly remains underneath. This keeps the cabinet nicely decluttered so you spend less time searching and more time cooking and cleaning up in the kitchen.