

Removing an undermount kitchen sink from granite involves detaching the sink clips securing it to the countertop. Carefully loosen the clips, disconnect plumbing, and lift the sink out to uninstall it without causing damage to the granite surface.
Curious about transforming your kitchen? Discover the simplicity of revamping your space with our step-by-step guide on “How To Remove Undermount Kitchen Sink From Granite?” Unleash the potential of your countertop by following our easy instructions, and take the first step towards a kitchen upgrade today!
Removing an undermount kitchen sink from granite involves loosening the securing clips, disconnecting the plumbing, and carefully lifting the sink. Take precaution to avoid damage to the granite surface during the process.
Understanding The Granite Mounting Process
Granite mounting is a meticulous process crucial for sink installation. First, ensure the granite is level and stable. Attach mounting brackets securely underneath, using a drill and screws. Check for proper alignment before tightening the screws to avoid damage. Precision is key in achieving a secure and lasting mount. Understanding the intricacies of this process ensures a stable foundation for your sink.
Granite mounting requires attention to detail, as a secure installation is vital for the longevity of the sink. Taking the time to follow each step ensures that the sink will be properly anchored, minimizing the risk of issues down the line.
Essential Tools For Safe Sink Disassembly
Disassembling a sink requires the right tools for a safe and efficient process. Start with a basin wrench for loosening nuts underneath the sink. Use a screwdriver to disconnect faucets and handles. A utility knife aids in cutting through any caulk or adhesive. Adjustable pliers are handy for removing water supply lines. Always wear safety gloves and goggles for protection. These essential tools make sink disassembly a straightforward task, preventing damage to the sink or injury during the process.
Safety is paramount during sink disassembly, and having the right tools at your disposal ensures a smooth and accident-free removal process. With the proper equipment, you can confidently and safely disassemble your sink.
Locating And Detaching Hidden Fasteners
Hidden fasteners play a crucial role in securing sinks, and locating and detaching them is essential for removal. Inspect the underside of the countertop carefully, as fasteners may be concealed. Use a flashlight for better visibility. Once identified, use the appropriate tools, such as a screwdriver or wrench, to detach them. Patience is key in this process, ensuring all fasteners are removed before attempting to lift the sink. Successfully locating and detaching hidden fasteners guarantees a smooth and damage-free removal process.
Finding and removing hidden fasteners can be challenging, but a careful and methodical approach ensures that no fastener is overlooked, allowing for a successful and trouble-free sink removal.
Step-By-Step Guide To Disconnecting Plumbing
Disconnecting plumbing is a crucial step in sink removal, and a step-by-step approach simplifies the process. Start by turning off the water supply valves. Use an adjustable wrench to disconnect the water supply lines. Place a bucket underneath to catch any remaining water. Next, Measure Undermount Kitchen Sink remove the P-trap and drain pipe. Inspect for any remaining connections and disconnect them carefully. Following these steps ensures a thorough disconnection of plumbing components, preparing the sink for removal without any mess or complications.
A systematic approach to disconnecting plumbing components ensures a smooth and efficient process, minimizing the risk of leaks or water damage during sink removal.
Ensuring Proper Shut-Off Of Water Supply
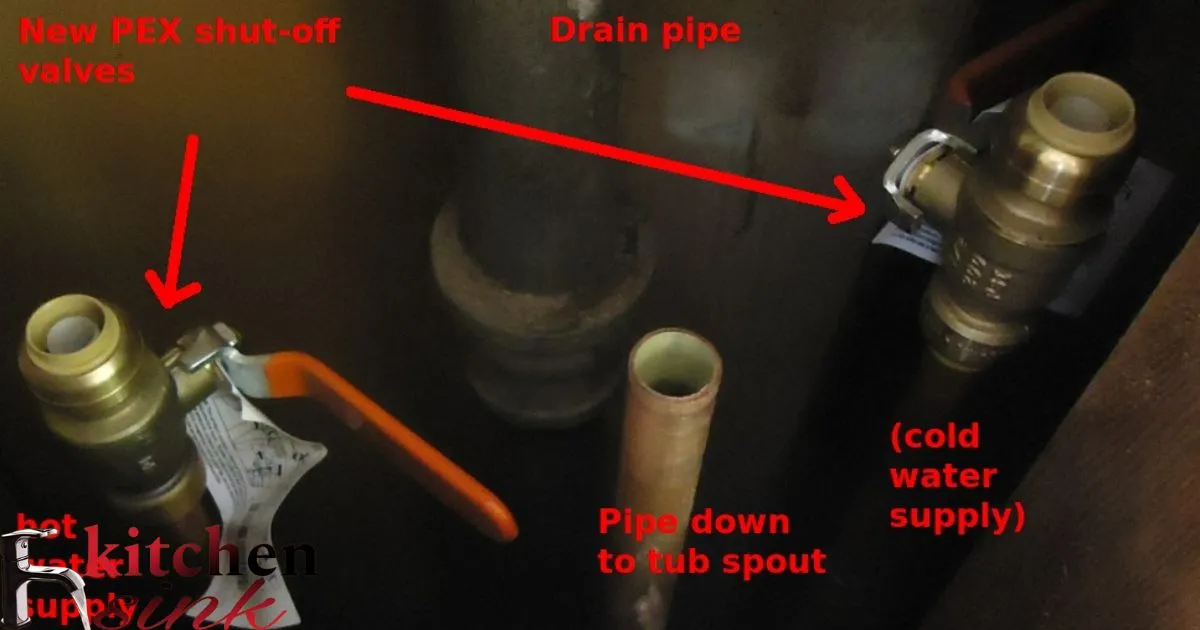
Before attempting sink removal, ensuring the proper shut-off of the water supply is crucial. Locate the shut-off valves beneath the sink and turn them clockwise until fully closed. To double-check, open the faucet to confirm water flow has ceased. This step prevents unwanted leaks during the removal process. Taking the time to ensure a secure shut-off of the water supply guarantees a cleaner and safer sink removal experience, protecting both the surrounding area and your plumbing system.
Properly shutting off the water supply is a fundamental precautionary measure, safeguarding against potential water damage and ensuring a hassle-free sink removal process.
Exploring Different Types Of Undermount Sink Mounts
Undermount sinks offer various mounting options, each with its unique features. Rimmed undermount sinks have a visible rim, providing additional support. Flush-mounted sinks sit flush with the countertop, creating a seamless look. Bracket-mounted sinks use brackets to secure the sink in place. Stud-mounted sinks attach directly to wall studs for stability. Understanding these different types of undermount sink mounts allows for informed decision-making when choosing the most suitable option for your kitchen or bathroom.
Exploring the various types of undermount sink mounts provides insight into their distinct characteristics, aiding in the selection of the most appropriate mounting method for your specific needs.
Debunking Common Myths About Sink Removal
Sink removal often comes with misconceptions that need debunking for a successful process. One common myth is that removing a sink is a quick DIY task. In reality, it requires careful planning and execution. Another myth is that sink removal won’t cause any damage. However, without proper precautions, countertops and plumbing can suffer. By dispelling these myths, individuals can approach sink removal with realistic expectations, ensuring a smoother and more effective removal process.
Addressing common myths surrounding sink removal provides a realistic perspective, helping individuals approach the task with adequate preparation and caution.
Protecting Granite Surfaces During The Removal
When removing a sink from a granite countertop, protecting the surface is paramount. Apply painter’s tape along the edges of the sink to prevent scratches or chipping. Use cardboard or a soft cloth to cover the countertop surface during removal. Additionally, place a thick blanket or cushion underneath the sink to cushion any accidental drops. Taking these precautions ensures that the granite surface remains unharmed throughout the removal process, preserving its aesthetic appeal and structural integrity.
Preserving the integrity of the granite surface requires thoughtful protection measures, safeguarding against potential damage during the sink removal process.
Tips For Handling Heavy Granite Countertops
Handling heavy granite countertops during sink removal requires careful consideration and proper techniques. Enlist the help of others to distribute the weight evenly. Use suction cups or granite carriers to lift and transport the countertop with greater control. Clear the removal path of obstacles to avoid accidents. Communicate effectively with your helpers to ensure a coordinated effort. By following these tips, you can navigate the challenges of handling heavy granite countertops during sink removal safely and efficiently.
Effective handling of heavy granite countertops demands teamwork and strategic planning, minimizing the risk of accidents and damage during the removal process.
Safety Precautions For Diy Sink Removal
Engaging in DIY sink removal necessitates adherence to safety precautions to avoid accidents and injuries. Wear protective gear, including gloves and safety goggles, to shield against potential hazards. Ensure the work area is well-lit to enhance visibility. Use sturdy and reliable tools for disassembly. If unsure, seek professional advice or assistance. By prioritizing safety measures, individuals can confidently undertake DIY sink removal, minimizing risks and ensuring a successful and injury-free process.
Prioritizing safety precautions is paramount in DIY sink removal, promoting a secure and injury-free experience for individuals tackling the task themselves.
Utilizing Support Brackets For Added Security
Support brackets provide essential reinforcement for undermount sinks. They are installed underneath the sink to add stability and prevent sagging. These brackets typically attach to the underside of the countertop and the sink itself. This ensures that the weight of the sink is evenly distributed, reducing the risk of damage over time.
Regularly check the condition of support brackets to ensure they are intact and securely fastened. If any brackets are loose or damaged, tighten or replace them promptly to maintain the sink’s stability and prevent potential accidents.
Inspecting And Repairing Any Damage
Regular inspection of undermount sinks is crucial to identify any damage early on. Check for signs of leaks, cracks, or chips around the sink area. If any damage is detected, address it promptly to prevent further deterioration.
Repair minor damage using appropriate sealants or epoxy compounds designed for use with your sink material. For more extensive damage, consult a professional to assess the situation and determine the best course of action to restore the sink’s integrity.
Disposing Of Old Undermount Sinks Responsibly
When replacing an undermount sink, it’s essential to dispose of the old one responsibly. Avoid simply throwing it in the trash, as this can contribute to environmental pollution.
Check with local recycling centers or waste management facilities to inquire about proper disposal options for old sinks. Many facilities offer recycling programs for metal, porcelain, and other sink materials, ensuring they are disposed of in an eco-friendly manner.
Considering Professional Help: When And Why
While DIY removal of undermount sinks is possible, there are instances where professional help may be warranted. If you’re unfamiliar with plumbing or countertop removal techniques, or if the sink is particularly large or heavy, it’s best to enlist the help of a professional.
Professional plumbers or contractors have the expertise and tools necessary to safely remove undermount sinks without causing damage to surrounding fixtures or countertops. Additionally, they can address any unforeseen complications that may arise during the removal process.
Comparing Removal Techniques For Various Sink Materials

The method used to remove an undermount sink can vary depending on the material it’s made from. For example, sinks made of stainless steel may require different techniques than those made of porcelain or granite.
Research and compare removal techniques specific to your sink material to ensure a safe and efficient removal process. Consult manufacturer guidelines or seek advice from professionals to determine the most suitable approach for your particular sink.
Maximizing Workspace Accessibility During Removal
Before removing an undermount sink, clear the surrounding area to provide ample workspace. Remove any items stored in cabinets below the sink and clear off the countertop to create a clutter-free environment.
Having easy access to the sink area will facilitate the removal process and minimize the risk of accidents or damage to nearby objects. Ensure there is sufficient lighting and ventilation in the workspace for added convenience and safety.
Potential Challenges And How To Overcome Them

Removing an undermount sink may present various challenges, such as stubborn sealants, tight spaces, or corroded hardware. To overcome these challenges, approach the removal process with patience and caution.
Use appropriate tools, such as sealant removers or pipe wrenches, to tackle stubborn sealants or hardware. Take your time to maneuver carefully in tight spaces, and consider seeking assistance from a professional if you encounter any significant obstacles.
Preserving The Integrity Of Granite Countertops
When removing an undermount sink from a granite countertop, take care to preserve the integrity of the stone surface. Avoid using excessive force or sharp tools that could scratch or chip the granite.
Use gentle, controlled movements when detaching the sink from the countertop to minimize the risk of damage. Place protective padding or towels on the countertop to cushion the sink and prevent scratches or dents during removal.
Post-Removal Cleaning And Maintenance Tips
Once the undermount sink has been successfully removed, thoroughly clean the surrounding area to remove any debris or residue. Use a mild detergent or cleaner appropriate for your countertop material to ensure a clean and sanitary surface.
Inspect the countertop for any signs of damage or wear and address them promptly to maintain its appearance and functionality. Consider applying a protective sealant to the countertop to enhance durability and prolong its lifespan.
Frequently Asked Question
Can I remove an undermount kitchen sink from granite without professional help?
Yes, with careful steps and proper tools, you can remove an undermount kitchen sink from granite as a DIY project.
What tools are required to remove an undermount sink from granite?
Gather a utility knife, silicone caulk remover, screwdriver, adjustable wrench, and a putty knife to safely and effectively detach the undermount sink.
How do I cut through the silicone sealant holding the sink to the granite?
Use a utility knife or a specialized silicone caulk remover to cut through the sealant, gradually loosening the undermount sink.
Is it necessary to disconnect plumbing before removing the undermount sink?
Yes, before starting the removal process, turn off the water supply and disconnect plumbing connections to prevent leaks or damage during the removal.
Can I reuse the undermount sink after removing it from granite?
Yes, you can reuse the undermount sink if it’s in good condition. Clean it thoroughly and apply fresh silicone sealant when reinstalling.
Conclusion
Understanding how to remove an undermount kitchen sink from granite is vital for homeowners looking to upgrade or replace their sinks. Following the correct steps ensures a smooth removal process without causing damage to the granite countertop. By carefully disconnecting plumbing and loosening the sink clips, individuals can successfully take out the undermount kitchen sink and prepare for the installation of a new one.
Proper knowledge of how to remove an undermount kitchen sink from granite empowers homeowners to undertake kitchen upgrades confidently. Whether it’s for renovations or simply replacing a worn-out sink, this skill allows for a hassle-free process that preserves the integrity of the granite surface. Taking the time to follow the right procedures ensures a successful sink removal, making it a manageable and rewarding DIY project for homeowners.