
Installing a kitchen sink under a window can pose a tricky plumbing challenge – how to properly vent the drain line. Improper venting leads to gurgling sounds, foul odors, and slow drainage; a frustrating situation for any homeowner. Careful planning and creative routing offers solutions.
Vent pipes serve a crucial role in allowing air flow to regulate pressure inside drain lines. This prevents unwanted bubble-ups and siphonage. Code requires vents to terminate at least 6 inches or more above the flood rim level of the attached sink fixture. But windows, cabinets, and other obstructions can block ideal vent placement.
When a window sill or cabinetry sits too low to accommodate standard vertical venting, there are a few alternative options. Loop vents, air admittance valves, and studor vents allow proper ventilation without having to notch windows or drill vent holes through visible areas. Some localized codes may restrict certain methods.
Kitchen Sink Venting Options
Standard vertical venting works well for kitchen sinks in most cases. But alternative options exist for tricky drain line routing. Vents prevent gurgling drains and foul odors. They require proper airflow and height above the fixture flood rim.
When obstacles like low windows block ideal vent placement, direction-changing pipes help. Loop vents route horizontally then vertically to proper heights. Studor vents use devices allowing small pipes to vent out walls.
Air admittance valves offer mechanical venting without much pipe routing. Local codes dictate which methods are approved per area. With measurement and planning, these creative venting techniques solve tricky sink drain situations.
Ventilation Matters for Effective Drainage
Vent pipes serve a crucial role in regulating air pressure within drain lines. This prevents gurgling sounds, foul odors, and slow/clogged drains. Improper venting also risks water getting siphoned out of critical traps.
Building Code Requirements
Plumbing code requires vent pipes to terminate at least 6 inches above the flood rim level of the attached sink fixture. This allows air flow while preventing overflow contamination.
The Obstruction Challenge
When a window sill, low cabinetry, or other structure sits too low, it blocks vertical vent pipe installation. Notching windows or drilling vent holes through visible areas also won’t pass inspection.
Assessing Your Layout and Measuring Carefully
The first step is taking measurements to understand clearance levels and drainage routing:
- Mark the planned sink drain and trap arm location.
- Measure from drain pipe to window sill height.
- Check codebook for minimum vent termination height above sink flood rim.
- Map out potential vent pipe routing options given obstacles.
Vent A Kitchen Sink Under A Window Without
Standard vertical venting is blocked when a window sits too low. But alternative direction-changing options exist. Proper airflow prevents drainage issues over time. The key is finding a method allowed by local code.
Explore innovative venting methods like loop vents, Studor vents, and air admittance valves. Wondering about Boiling Water Down Kitchen Sink Discover efficient solutions for proper kitchen plumbing maintenance.
Careful measurement, planning, and certified installations achieve code compliance without exterior vent or window notching. Inspecting routinely ensures unconventional methods work as intended for the long run.
Alternative Direction-Changing Vent Methods

When vertical venting just won’t fit, it’s time to get creative. Here are a few direction-changing options to provide airflow:
Loop Vents
- Route pipe horizontally under window
- Use 45° and 90° elbow fittings
- Bring vent back up to proper height
- Connect to drain arm with Wye fitting
Studor Vents
- Install vent device on drain arm
- Run small diameter pipe horizontally
- Terminate at code-approved height
- Requires routine maintenance
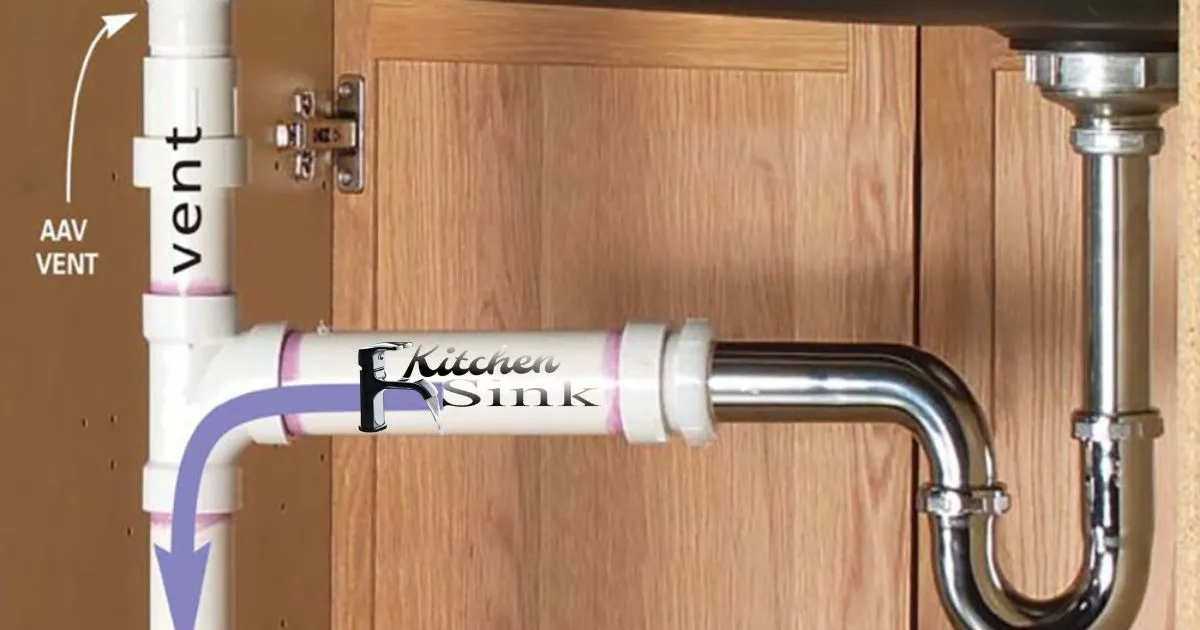
Air Admittance Valves (AAVs)
- One-way mechanical venting device
- Mounts vertically near fixture
- Less routing needed
- Check if approved by local code
Step-by-Step Installation Guide
Once you’ve selected the best venting method, follow key steps for proper installation:
1. Install Drainage First
- Run drain line and set P-trap per code
- Slope pipe min 1⁄4 inch per foot
- Position drain rough-in capped below sink flange
2. Dry Fit Vent Piping
- Measure and cut necessary vent pieces
- Dry fit elbows and fittings to planned layout
- Ensure minimum 1⁄4 inch slope
3. Permanent Vent Connections
- Deburr pipe interior with utility knife
- Chamfer outside of pipe ends for easier insertion
- Apply solvent cement thoroughly per manufacturer instructions
- Insert pipe fully and hold 30 seconds for bonded connection
4. Test and Inspect
- Seal sink flange and test for leaks with water
- Get inspection approval before concealment
- Ensure proper drainage flow after fixture install
kitchen sink vent pipe
Vent pipes let air flow in and out of drain lines. This balances pipe pressure. Vents prevent gurgling sinks and foul odors. They require proper routing to work right.
Vents must terminate above fixture flood rims per code. This stops contamination if water overflows. Proper vent height depends on drain pipe size.
Here is a table of minimum vent termination heights:
| Drain Pipe Diameter | Min. Vent Height Above Sink |
| 1 1/4″ | 6″ |
| 1 1/2″ | 6″ |
| 2″ | 6″ |
| 3″ | 6″ |
| 4″ | 12″ |
In summary, all drain pipe sizes under 3” require at least 6” vent clearance above the sink flood rim. 4” drains need 12”. Following code means vents work safely and pass inspection.
Maintaining Your Venting
Improper maintenance can defeat an unconventional vent pipe setup over time:
- Periodically inspect visible fittings and connections
- Routine cleaning if installed a studor vent device
- Address any gurgling or slow drains immediately
How To Vent A Sink Without A Vent
Standard vent pipes let air flow in and out of drains. This balances pressure and odor. Many alternative options exist when vertical vents won’t fit. Proper ventilation prevents water from getting siphoned out.
Air admittance valves offer mechanical venting without routing pipes. Island vent loops snake horizontally before turning vertical. Studor vents use devices for small terminations. Careful planning and certified installation of these methods meet code. They work as intended for good drainage and no gurgling. Local regulations dictate which technique is approved per area. With creativity, sinks drain properly without exterior venting.
Frequently Asked Question
What if my window sill is too low for vertical venting?
Use direction-changing vents like loop, studor, or air admittance valves that route horizontally first.
Can I just drill a vent hole through the window?
No, visible exterior venting won’t pass inspection in most areas.
How high should the vent terminate above the sink?
Minimum 6 inches above flood rim level, more for larger drain diameters.
Does proper venting prevent gurgling drains?
Yes, it allows air flow to balance pipe pressure and drainage.
Which venting options meet plumbing code?
Research local regulations to see which methods like studors or AAVs are approved.
Conclusion
When faced with the challenge of venting a kitchen sink under a window, there are several direction-changing pipe options to create proper airflow. Carefully measured and sloped loop vents, studor vents, or air admittance valves route horizontally before turning vertically to terminate at approved heights. Local codes dictate which methods meet regulations.
With proper planning using one of these alternative venting techniques, inspection approval and good drainage can be achieved without exterior venting or window notching. But occasional maintenance checks ensure unconventional pipe setups work properly long-term without siphonage or clogging issues. Overall, a tricky sink and window layout is no match for creative vent problem-solving following standard venting principles.